
Woocommerce Extension Documentation

Install and customize Octopush in your Woocommerce store.
Table of contents
- Overview
- Installing the extension
- Update the extension to newer versions
- Plugin Settings
- Messages
- SMS for Admin
- SMS for customer
- How to edit the messages
- Settings
- How to calculate the amount of SMS per message
- Campaigns
- How to send an SMS Campaign
- List of campaigns not sent
- Settings for the SMS
- Choose the recipients
- List of recipients
- Information
- History
- News
Overview
Octopush SMS extension for Woocommerce is a text-messaging service for sending notifications, alerts, reminders, confirmations and SMS marketing campaigns.
Attract more leads. Send Bulk SMS campaigns with special offers and grow your sales.
Re-engage with shoppers. Remind your customers of their abandoned carts to finish their purchases.
Improve customer relationship. Let your customers know when their shipping is arriving.
Installing the extension
To install the extension you will need:
- a Woocommerce store
- an Octopush account (open one here)
1) Get the extension
Download the FREE extension directly from your Octopush account (click here if you need help opening your account).
Sign in to your Octopush account. You’ll see a screen just like this.
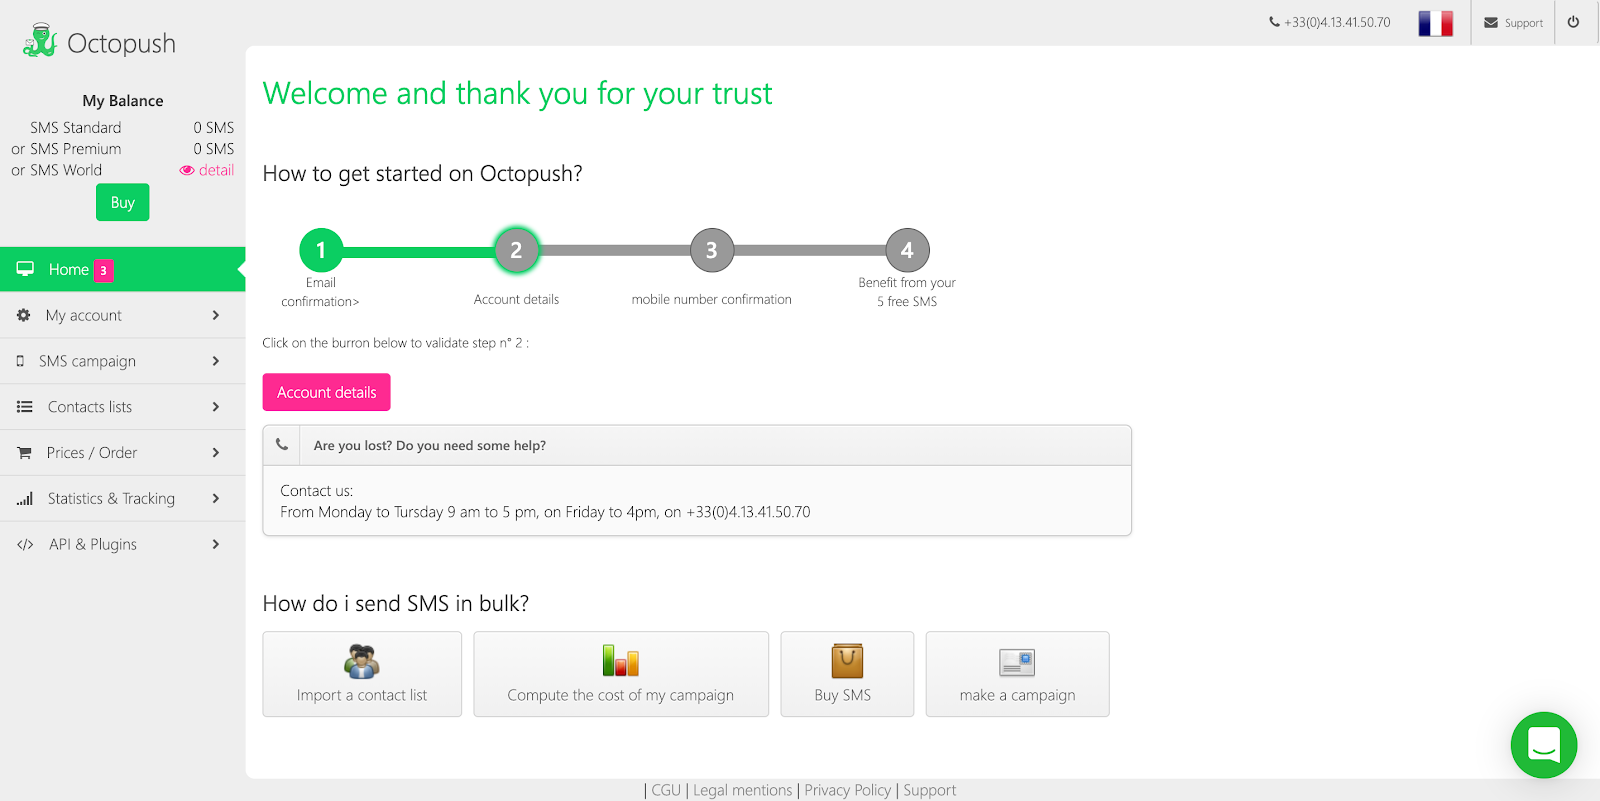
Click on API & Plugins, and then on Plugins & Modules and you’ll see all of our extensions. Click on the pink buttons to start downloading according to the version of Woocommerce that you have.

After downloading, you’ll see a file like this one in your Downloads folder. We’ll use it for the installation later on.

2) Quick Installation
Go to your Woocommerce account and click on “Plugins” of the left menu. Then click on “Add New”
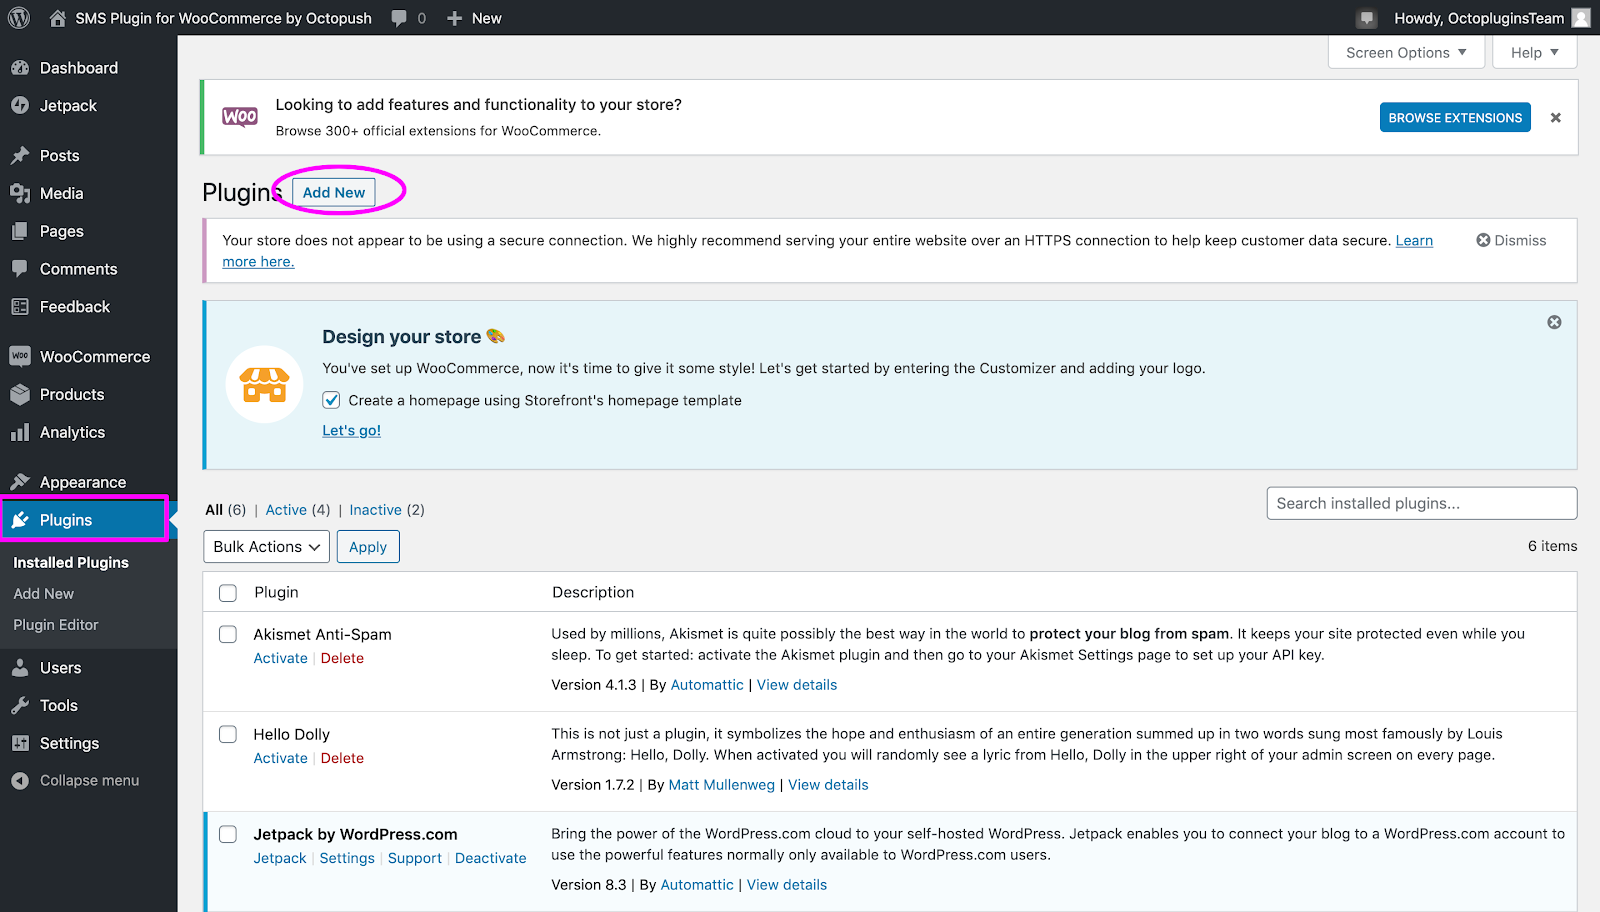
Click on “Upload Plugin”
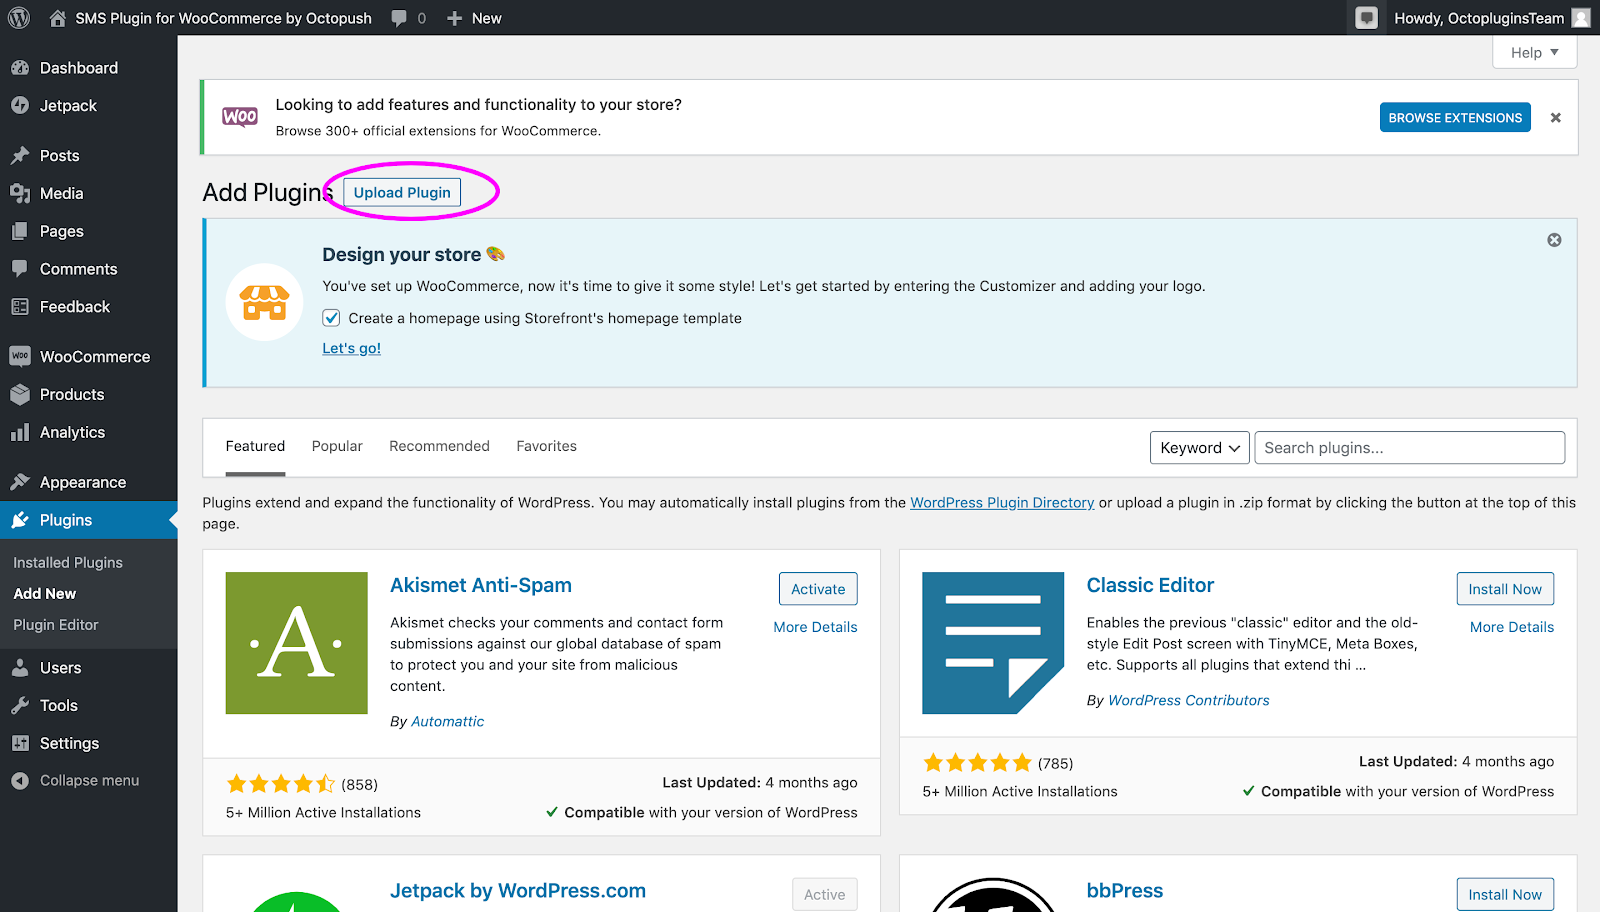
You’ll see a window like this:
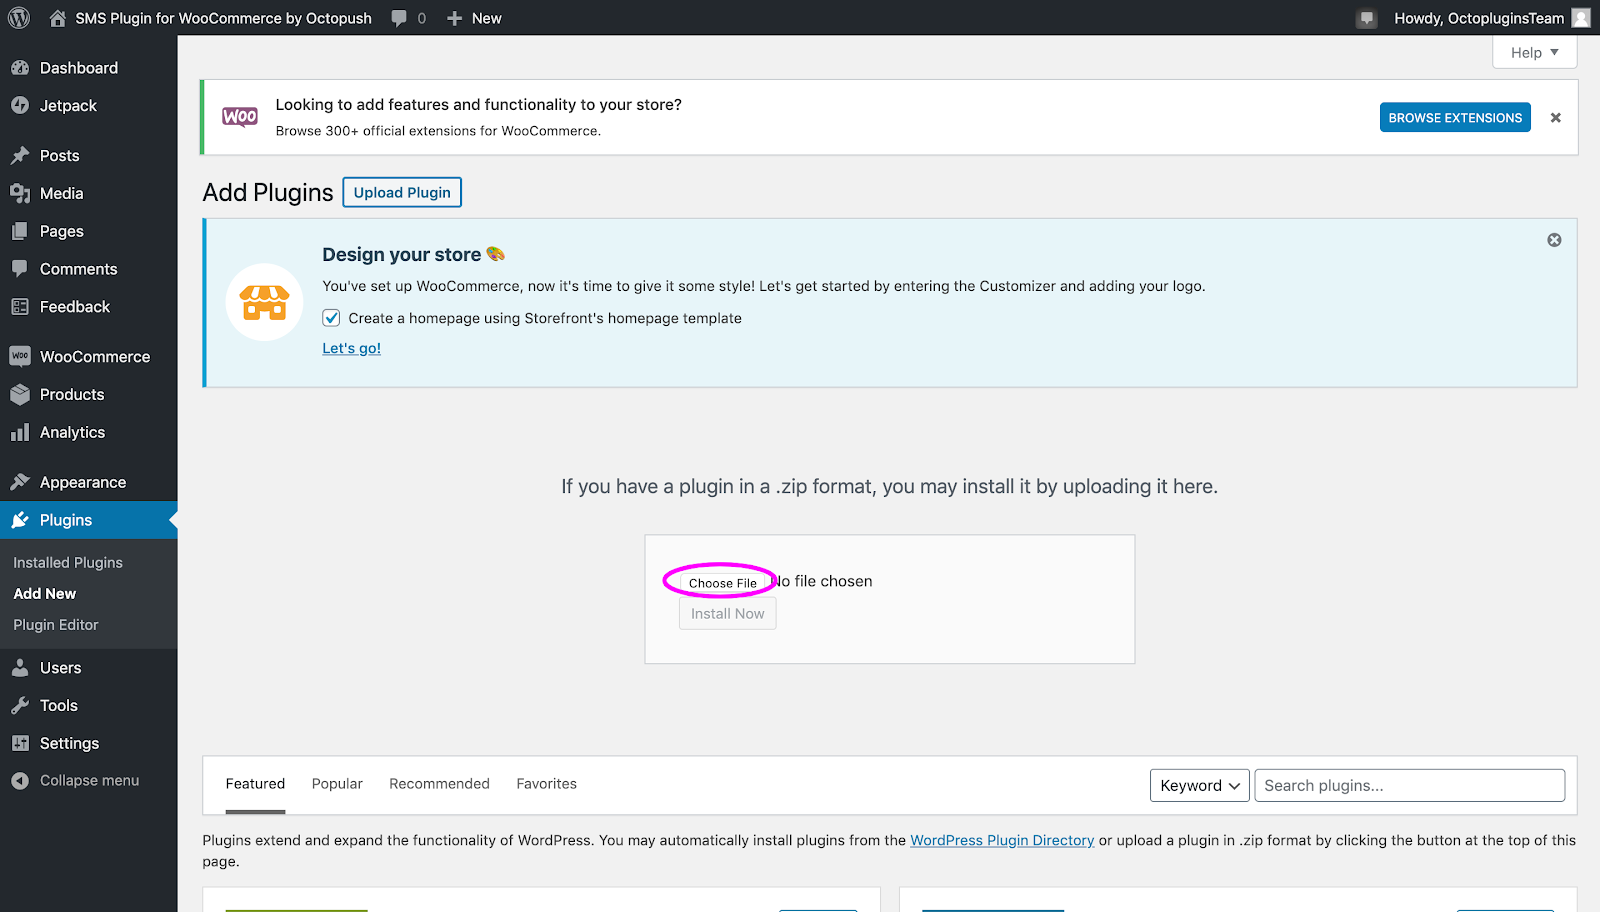
Choose the file that you previously downloaded from your Octopush account.

Click on “Install Now” and then on “Activate Plugin”

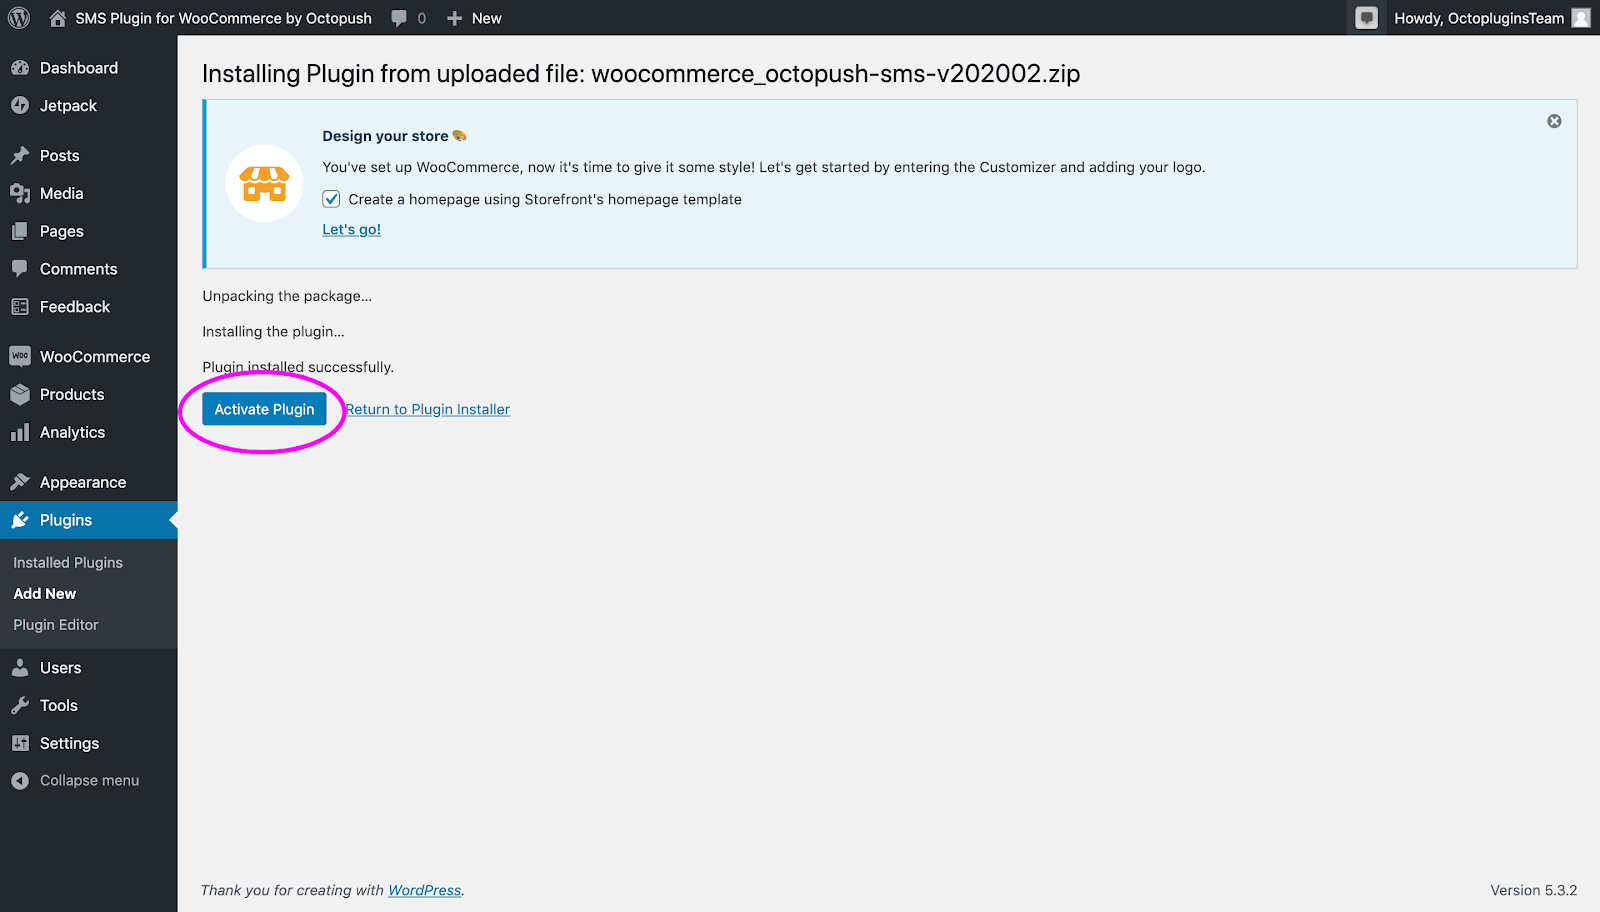
Once the plugin is activated, you’ll see it in the Plugin section.

3) Connect your Octopush account
Click on “Settings” (below the name of the plugin) to connect with your Octopush account and set your preferences.

Here you’ll be asked to create an Octopush account if you don’t have one yet (click here to see the tutorial).
After that, you’ll have to connect your Octopush account to your Woocommerce store.
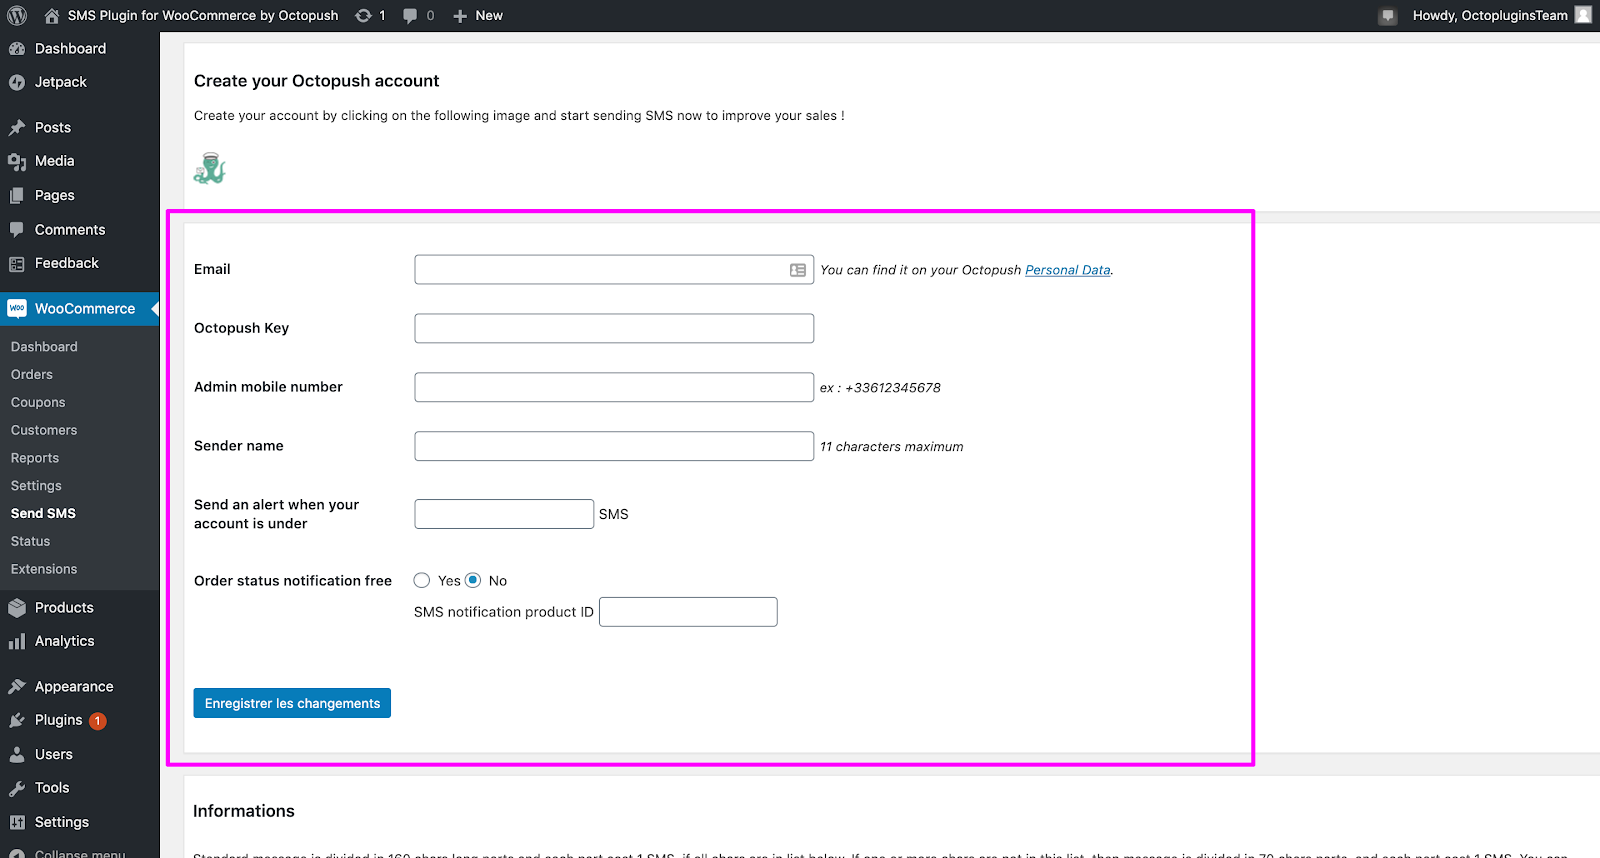
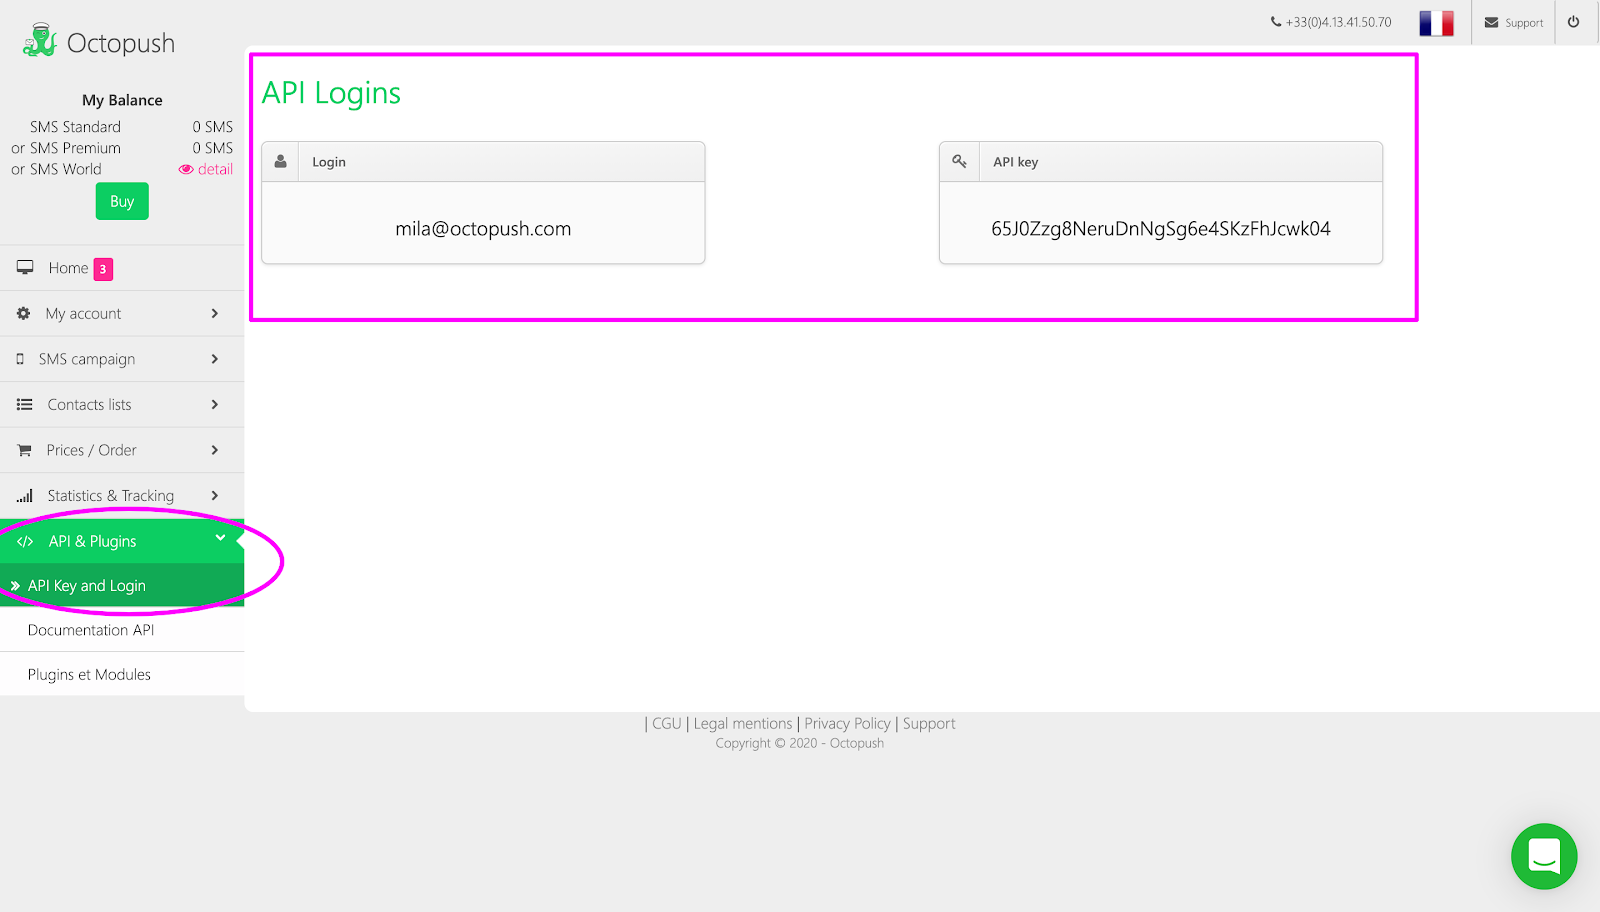
To get your Octopush login and API key, go to your Octopush account and click on API & Plugins > API key & login.
Copy that information into your Woocommerce store and finish completing with your preferences.

Click on the blue button to save your changes.
Plugin Settings
Messages
Here you can edit all of the automated SMS you can send to yourself and to your customers.
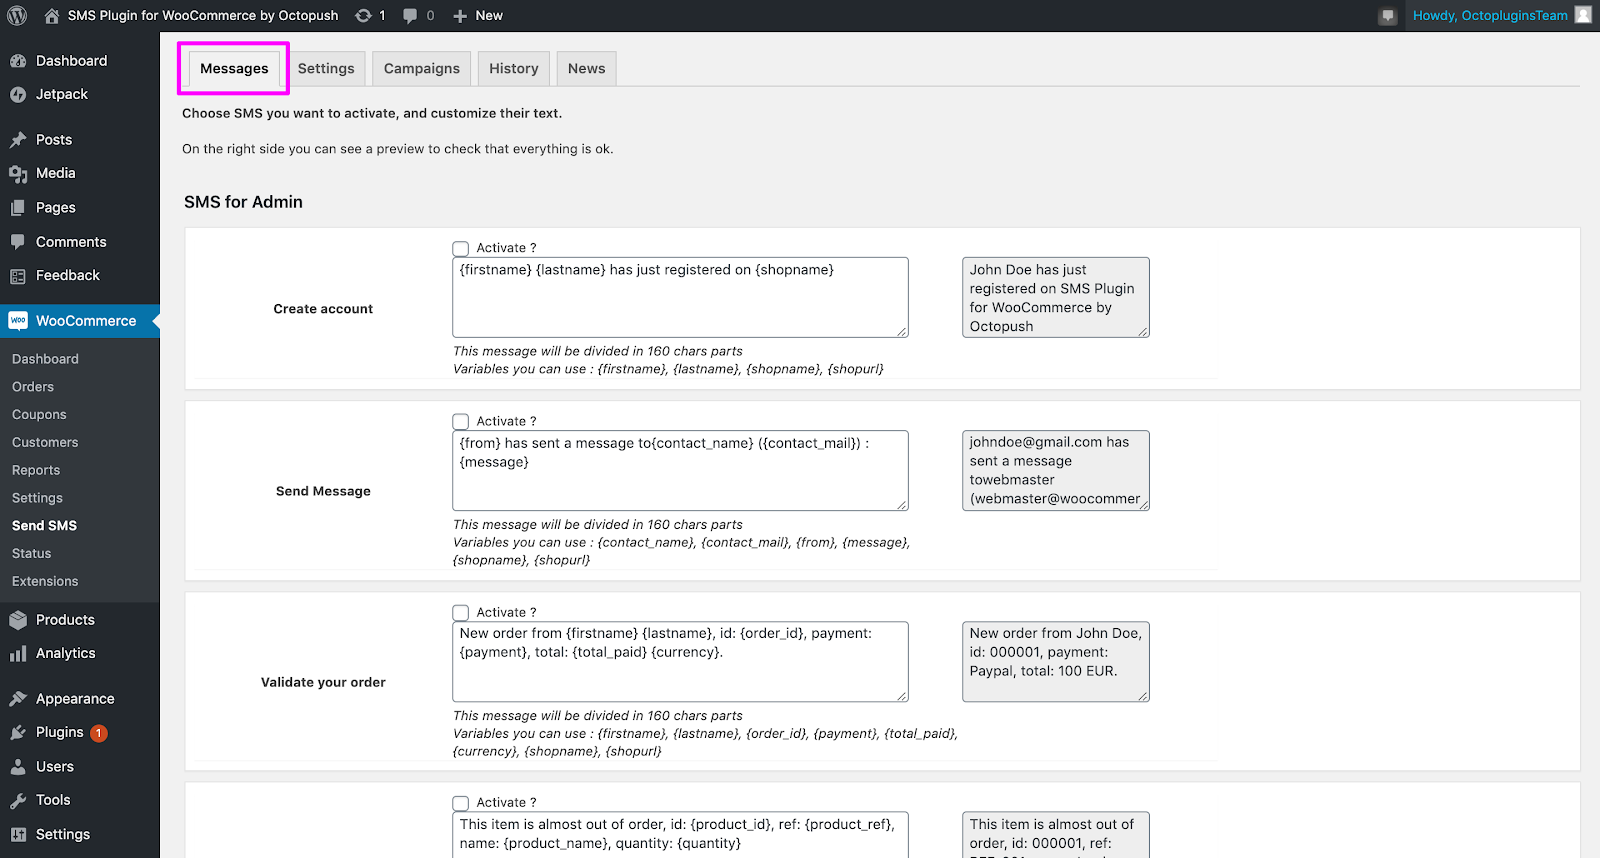
SMS for Admin
These are messages that you send to yourself to notify of important events on your Woocommerce store. You can trigger messages for these events:
- Create account: a customer creates a new account
- Send Message: a customer sends you a message
- Validate order: a new order is placed and needs validation
- Stock notification: a product is almost out of stock
- Admin alert: your Octopush account is almost out of balance
- Daily report: to receive a report on the activity of your store
SMS for customer
These are messages that you send to your customers to notify of important events on their accounts or orders. You can trigger messages for these events:
- Create account: welcome message to new customers
- Lost password: ask for a new password
- Send message: to confirm you received the message from your customer
- Validate your order: to confirm the new order is validated
- Status update: the status on their order changes
How to edit the messages

To the left, you’ll see the event that will trigger the action (in this example, the message will be sent to new customers when they create an account).
Edit the message on the left white box. Include as many variables as you like (below you’ll see the ones that you can use).
Above the white box, you’ll see a checkbox. If checked, it’ll set your message live.
On the right you'll have a preview of your message as your recipient will see it.
After configuring your messages, click on “Update”. To restore all of the texts to default, click on “Reset all messages”.

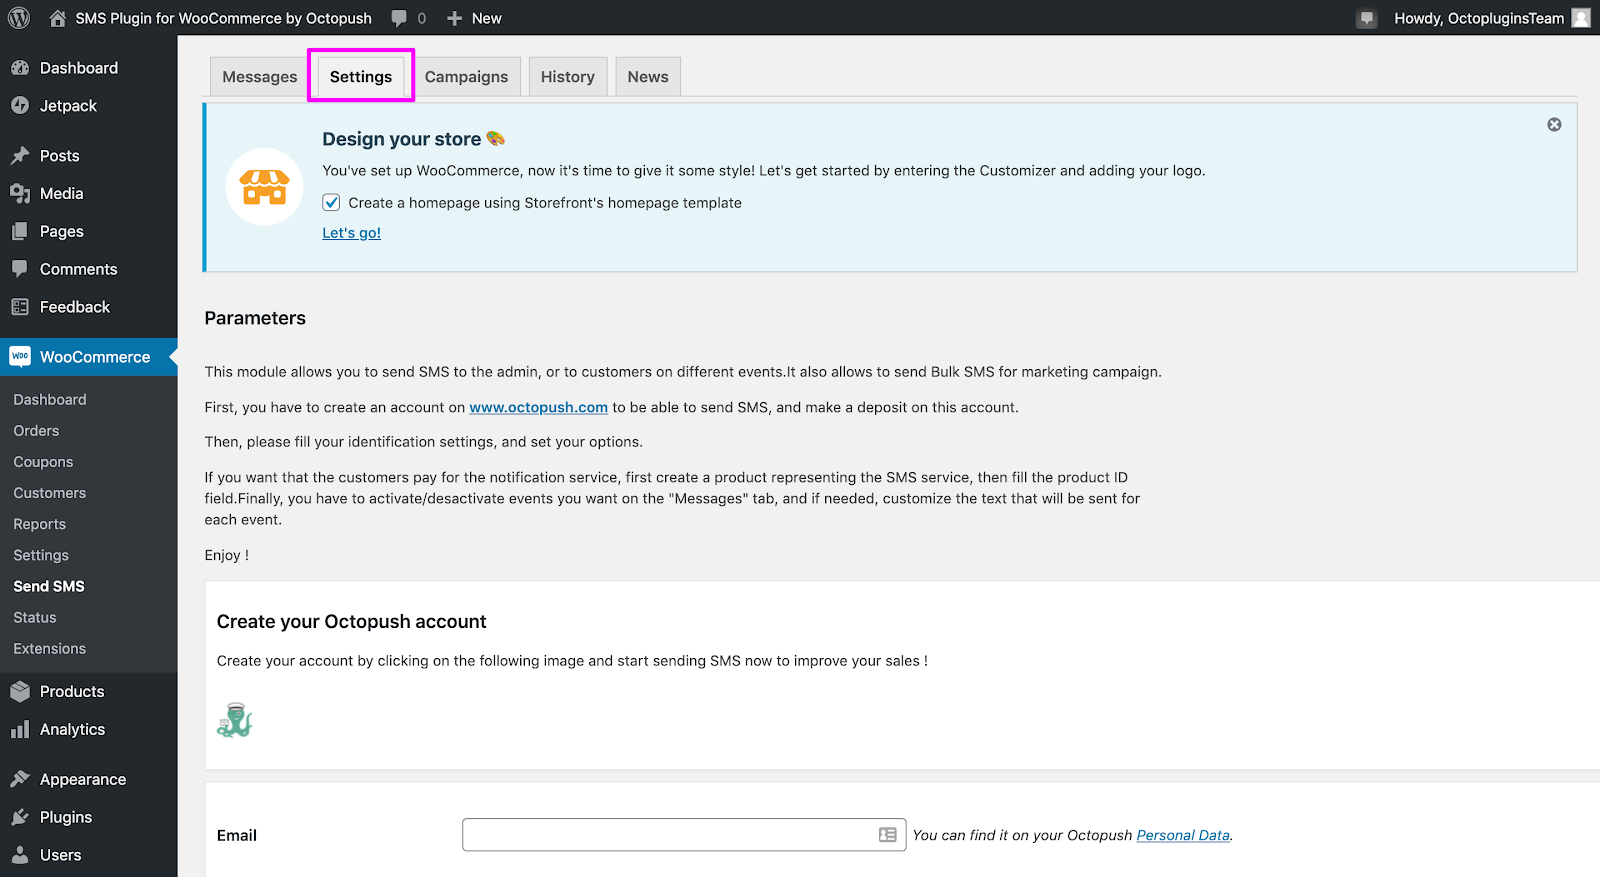
Settings
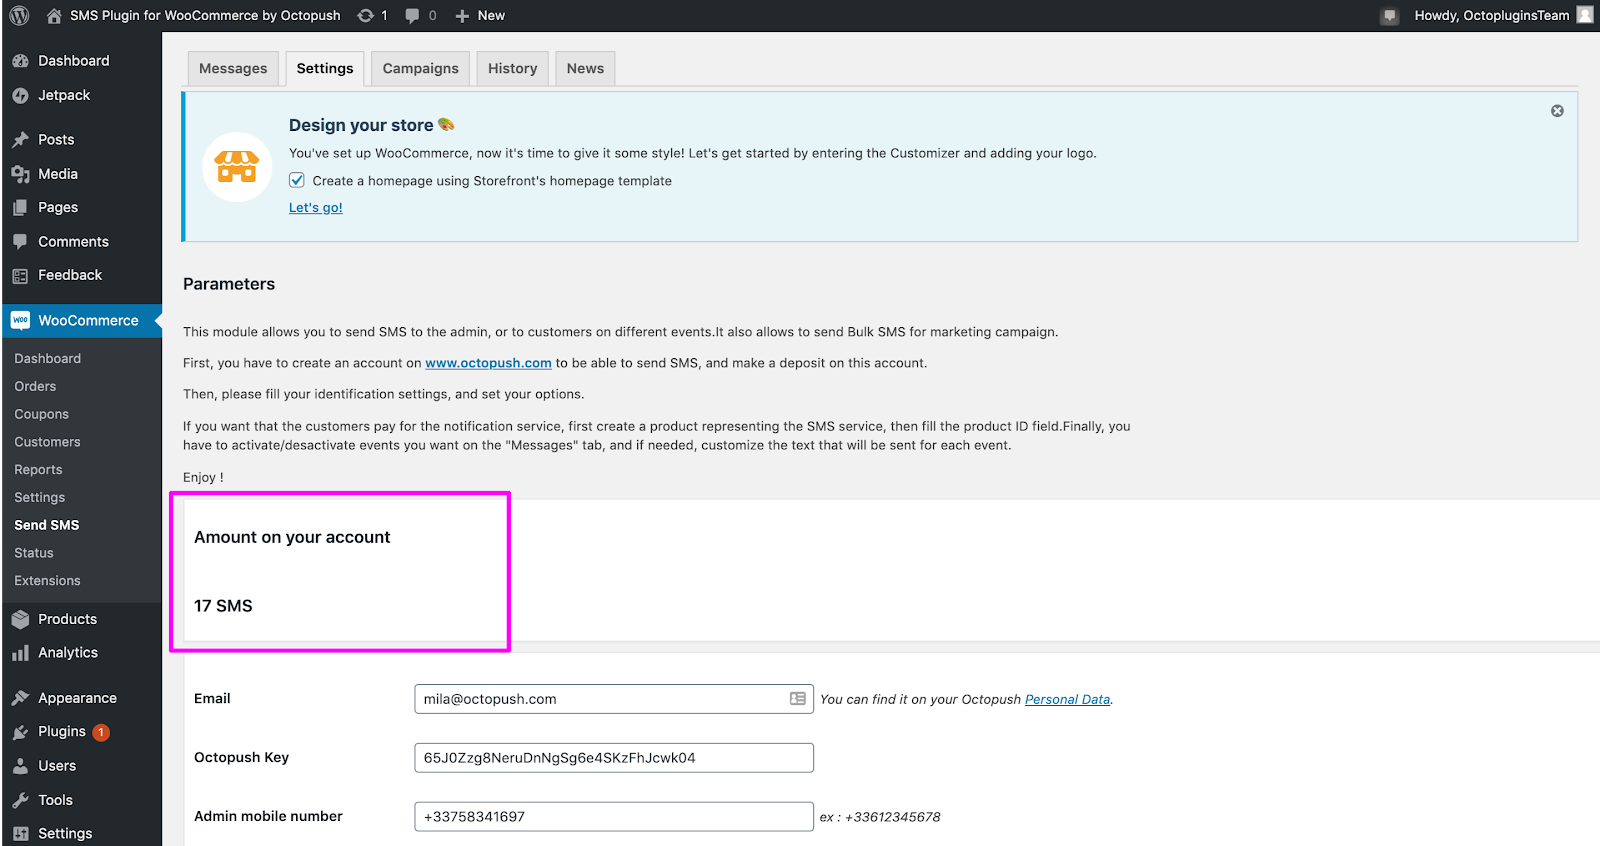
Here you’ll have to enter your Octopush information to connect your account and enter your account configuration for the extension.
Once you’ve connected your Octopush account, you’ll see your Octopush balance here, expressed in SMS.
Here are the settings of your account:

Email: your Octopush Login
Octopush Key: your Octopush API key
Admin mobile number: the phone number you’ll use to send SMS to your customers. It should include international code and a + before the number, eg. +33758341697
Sender name or phone number: this is the name your customers will see when they get your SMS. Insert the name of your store here in no less than 4 characters, and a maximum of 11. It can include numbers and letters.
Send alert when account under: this is an alert for the admin. It will trigger an SMS when your credit on Octopush goes below this value, so you’ll be aware that you need to recharge it. Enter the value you want in SMS.
Order status notification free: select yes if you want to offer a status notification via SMS to your customers for free. If you wish to make this service optional and charge them if they decide to get it, select the option No, customer have to pay the option.
How to calculate the amount of SMS per message
After the settings you’ll see this Information box regarding the cost of SMS due to the number of characters or value of special characters.

It shows characters that are replaced automatically, authorized characters for a Standard Message and the special characters that count per 2.
Note: a Standard Message is divided into 160 characters long and it costs 1 SMS if all of its characters are included in the list. If one or more characters are not in the list, then the message is divided into 70 characters long parts and each part will cost 1 SMS.
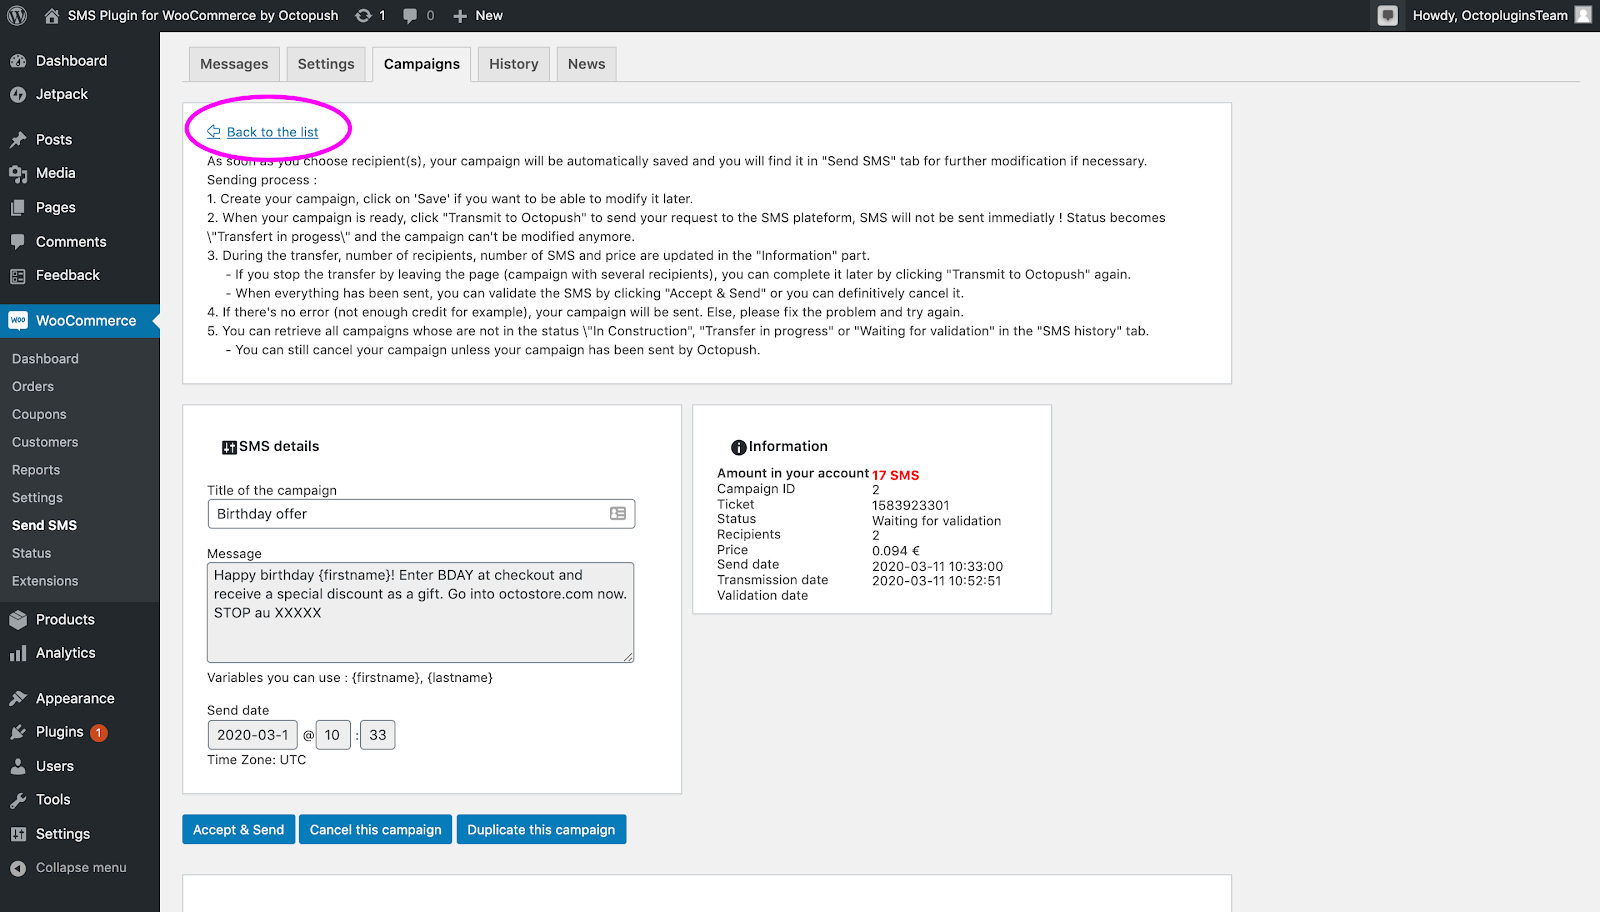
Campaigns
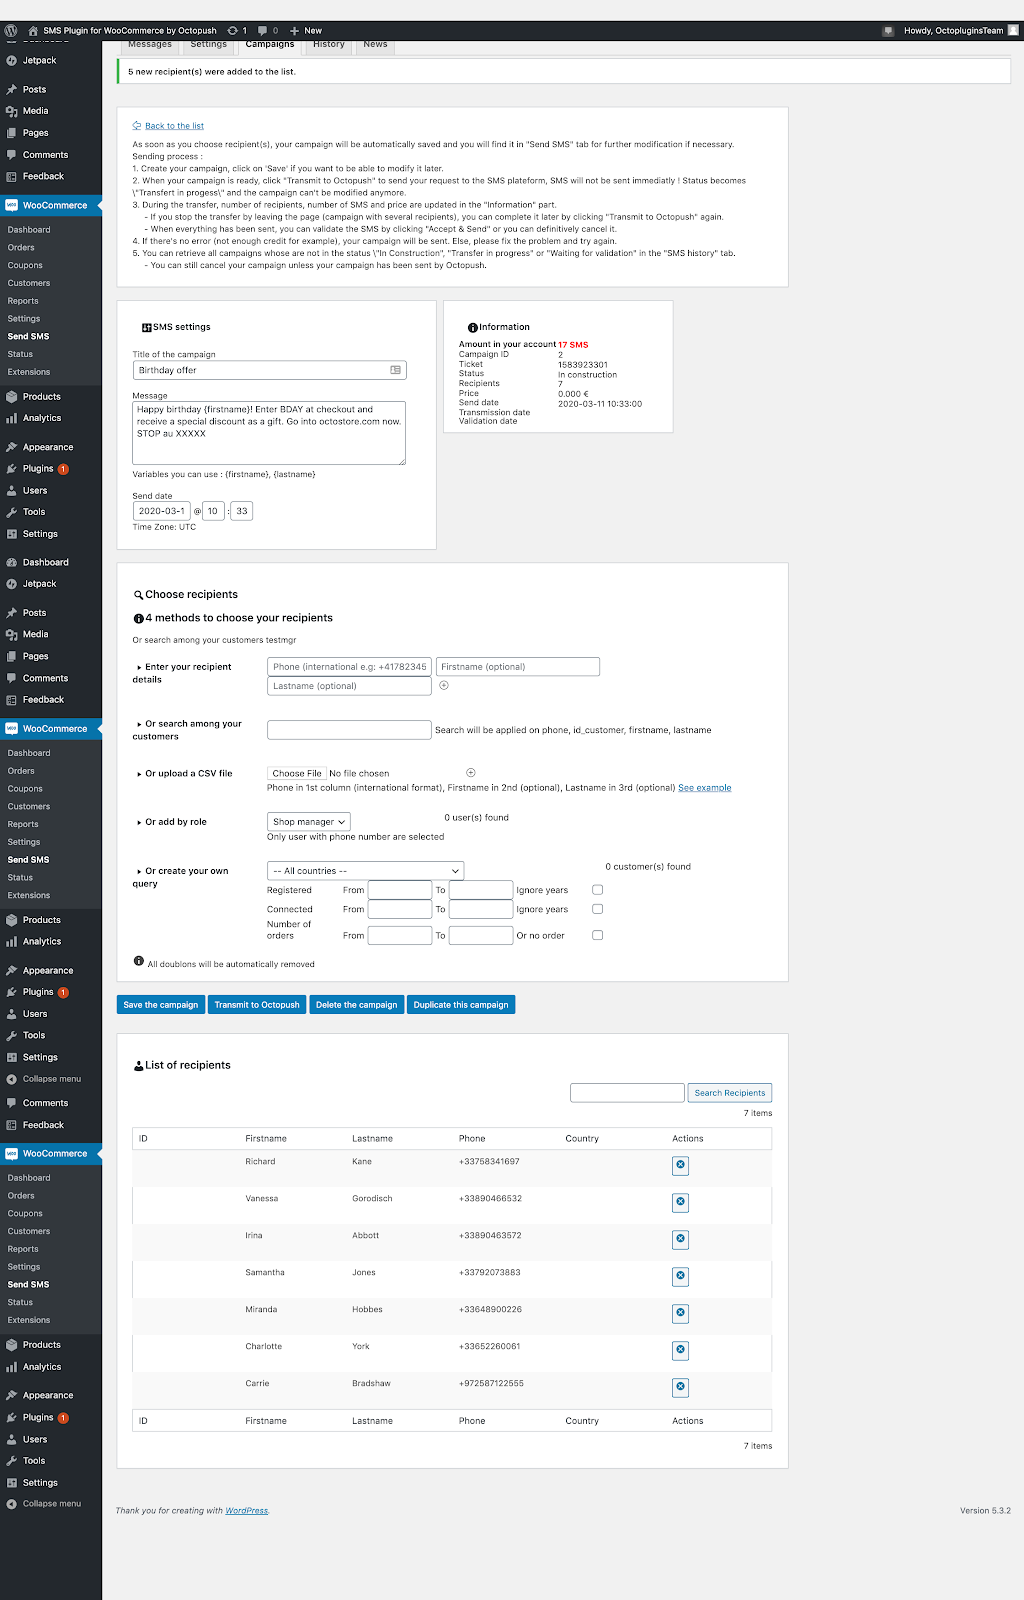
Here is where you can send your SMS campaigns from.

How to send an SMS Campaign
- Give your campaign a title and write your message. If you wish to, you can use the variables listed right below the textbox where you write your SMS. Note: the title of your campaign is for internal use only. Your recipients won’t see it.
- Set the date and hour for the delivery. Note: the timezone is GMT+1.
- Choose the recipients entering their phone numbers, uploading them with a CSV file (Excel) or create your own segment with the information you collect from your Woocommerce store. Note: always click the green + to add the recipients to your list.
- Check that you have available credit in the Information box on the right.
- Click on “Save campaign” if you wish to keep editing later. If you’re ready to go, click on “Transmit to Octopush”. You can also delete or duplicate the campaign with the other buttons. Note: you have to keep going to the next step to successfully send your campaign.
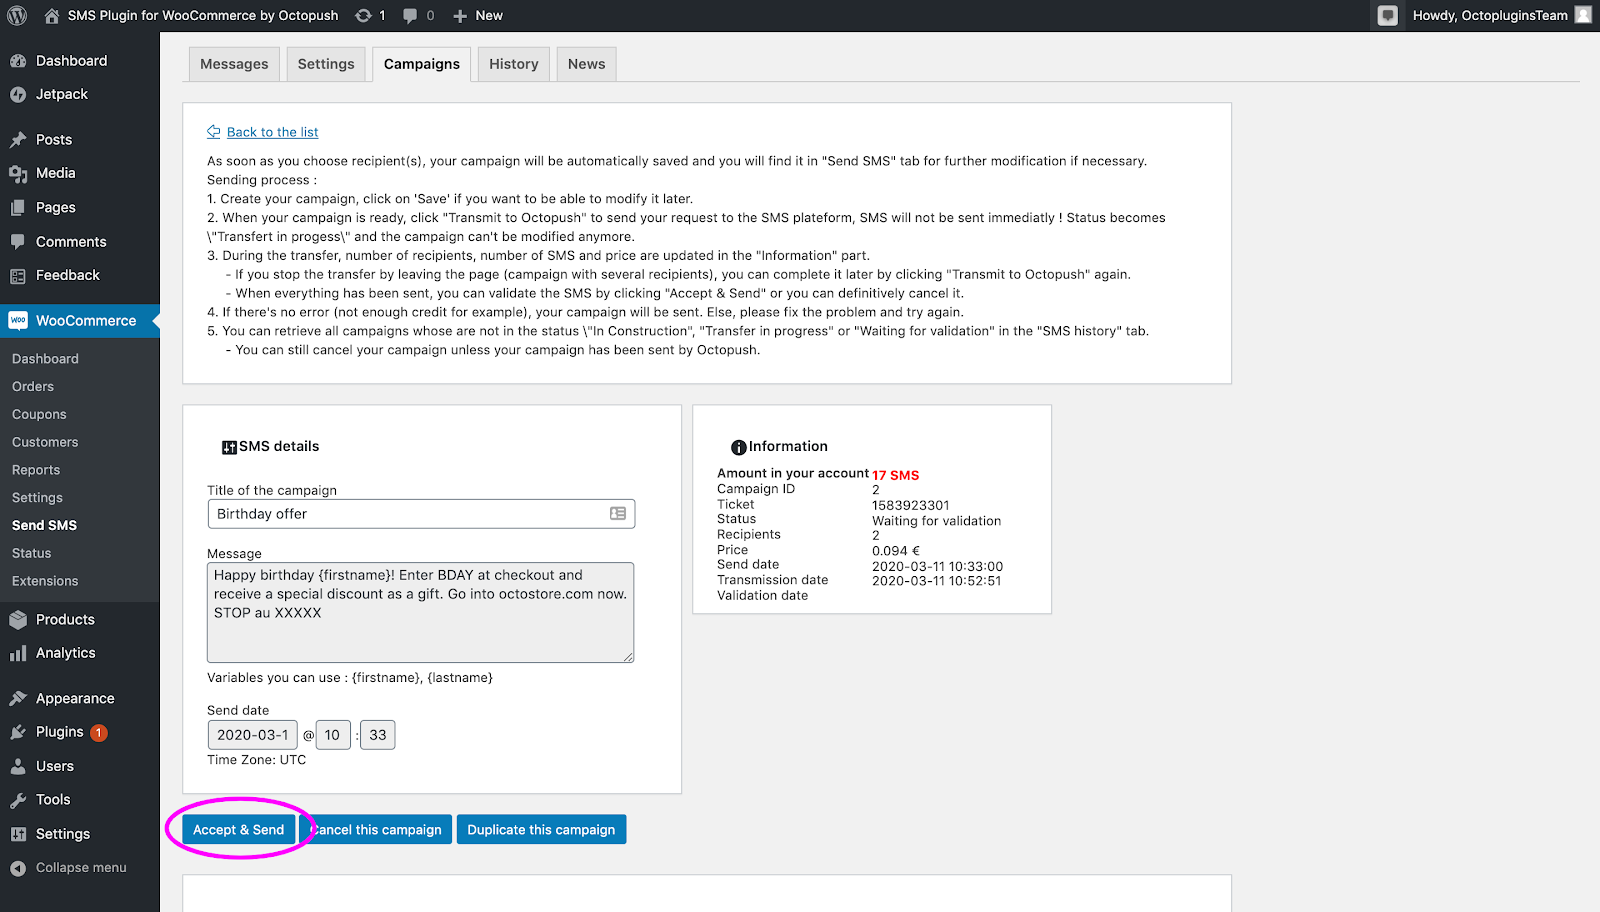
- In the next window, you’ll have to “Accept and Send”.
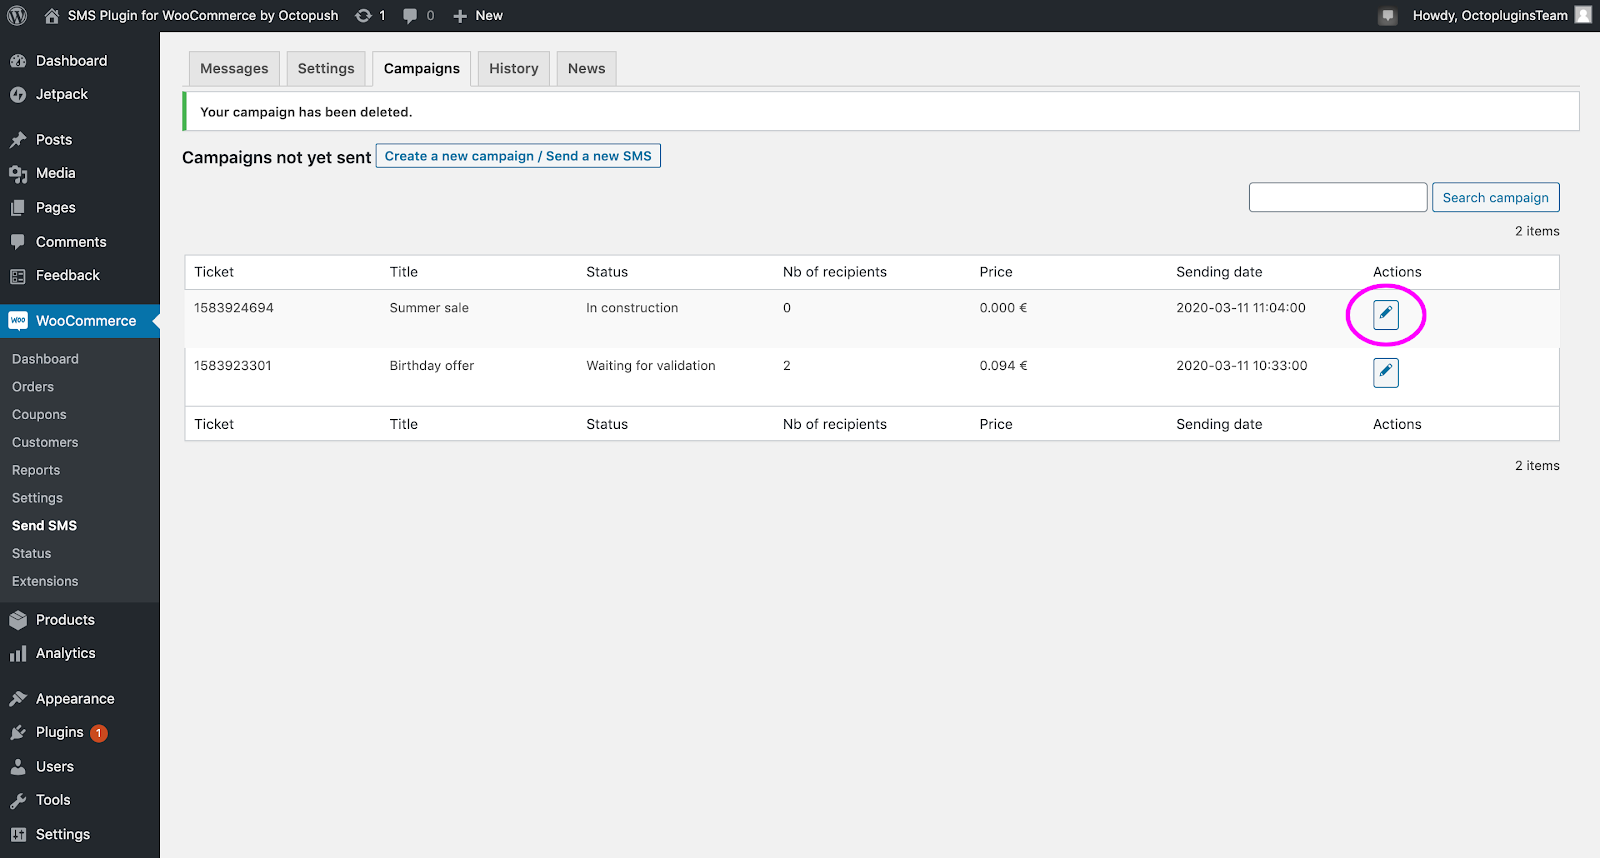
List of campaigns not sent
To see your campaigns that are in construction, waiting for validation or in other status rather than sent, go to “Back to the list” from the Send SMS tab.
Here you’ll find your saved campaigns. To edit, click on the edit icon on the right.
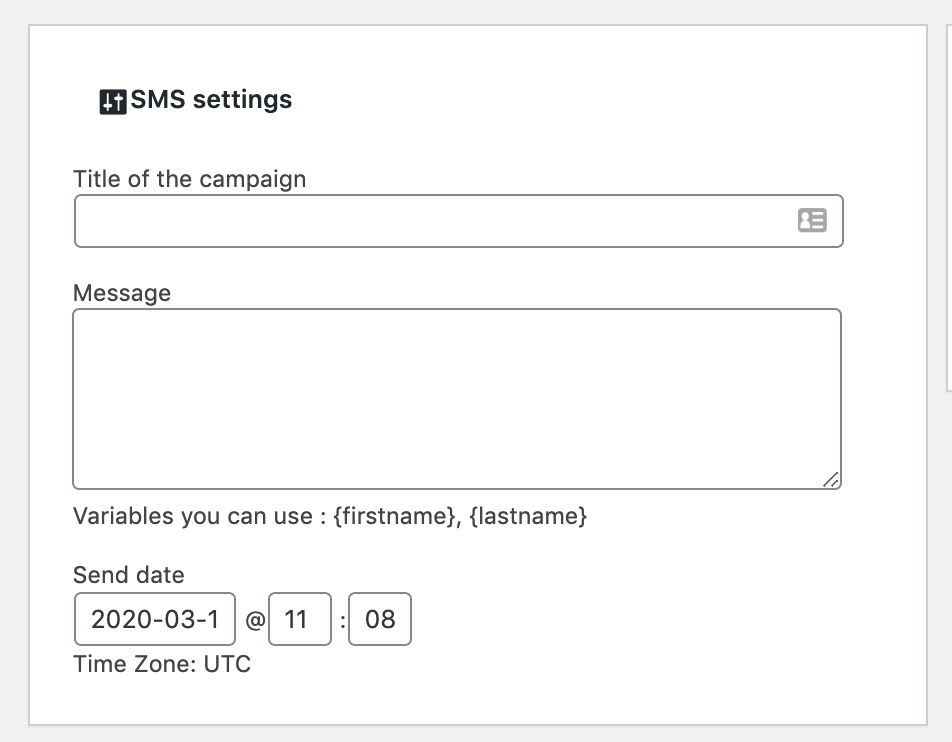
Settings for the SMS
This is where you compose the message of your campaign.
- Title of the campaign: enter a title to recognize your campaign easily. This is only for internal use and your recipients won’t see it.
- Message: type here the text of your SMS. You can include the variables that you see below the textbox to personalize your message (like first name and last name).
- Send date: this is the date when the message will be delivered.
Choose the recipients
Select the recipients of your campaign with one of the following 4 methods. Consider that duplicated numbers will be automatically removed.
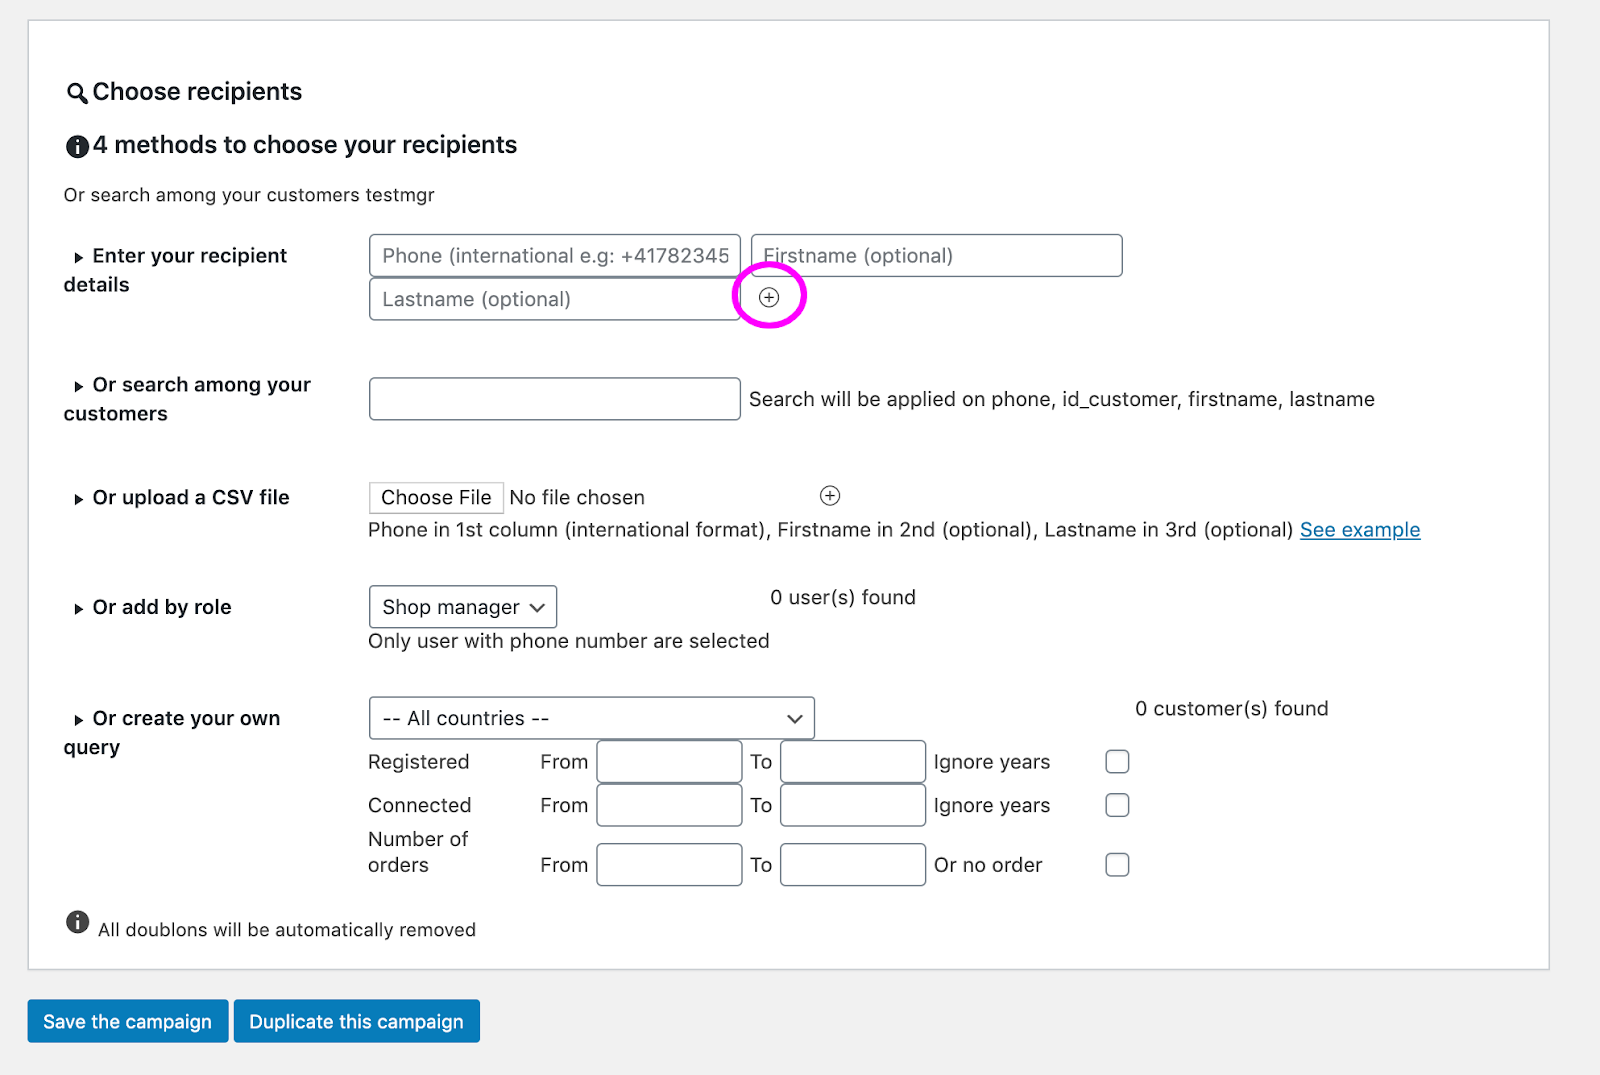
Enter the recipient details
Enter the phone number manually with country code. Eg. +33758341697. You can also include First name and Last name if you wish.
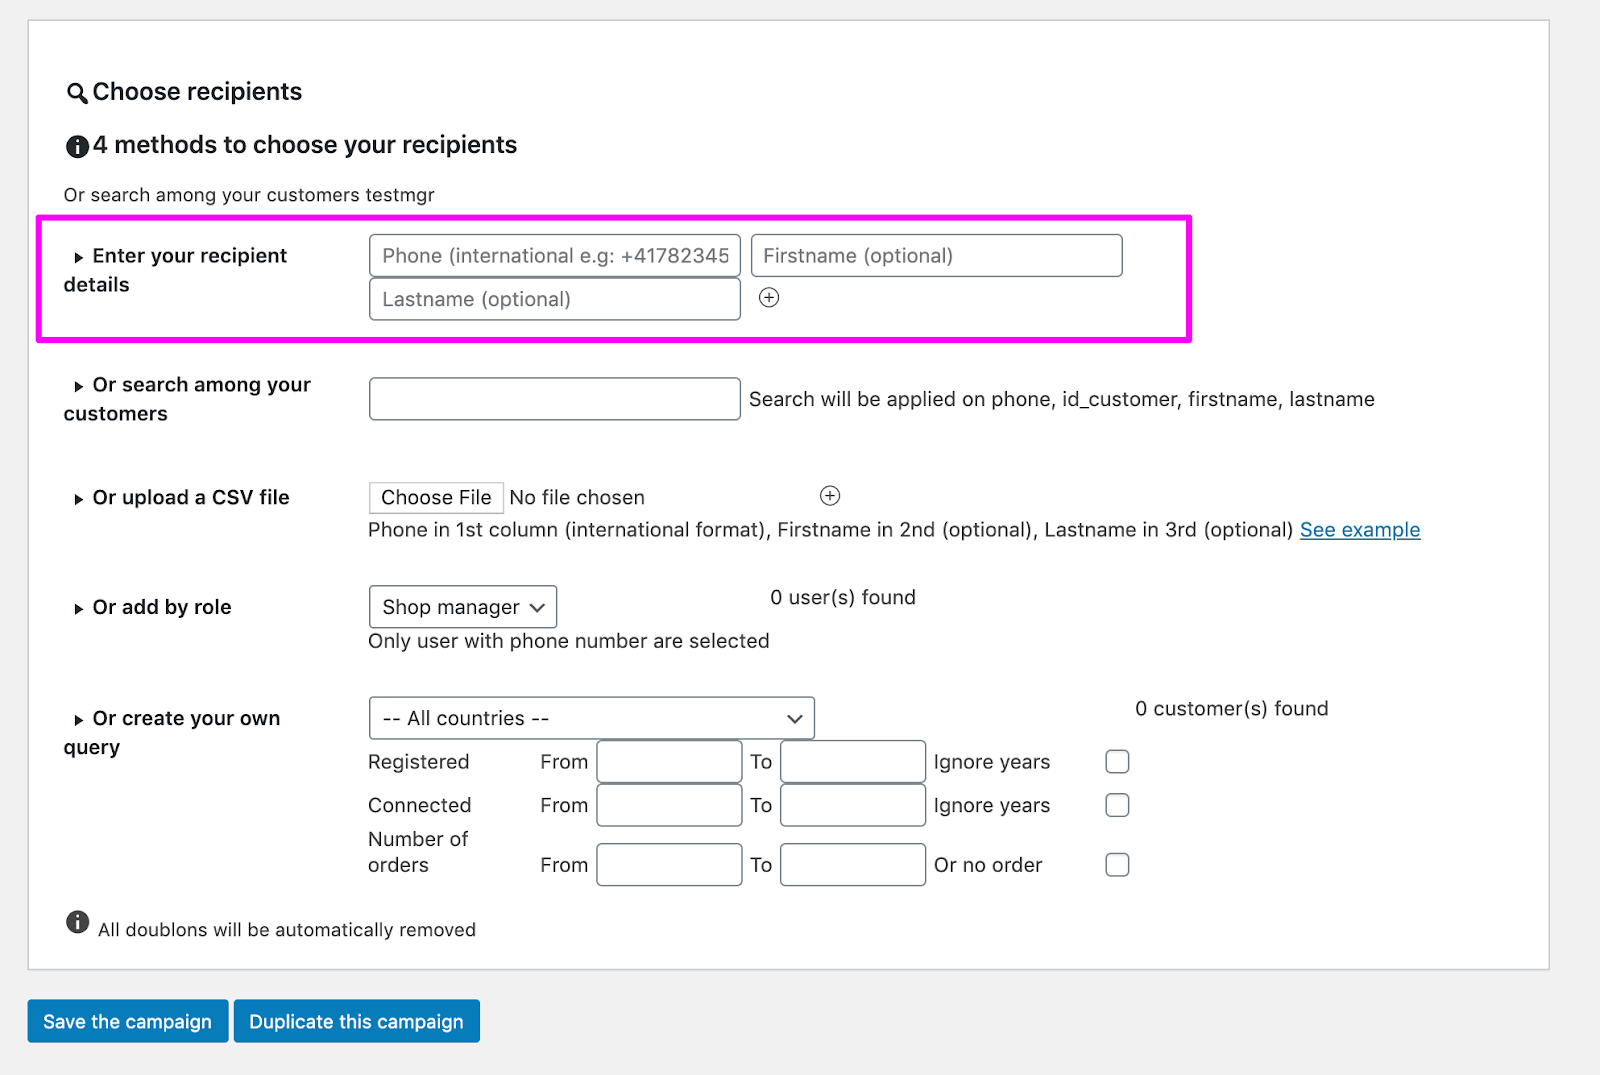
Remember to press the sign + to add the recipient to your list.
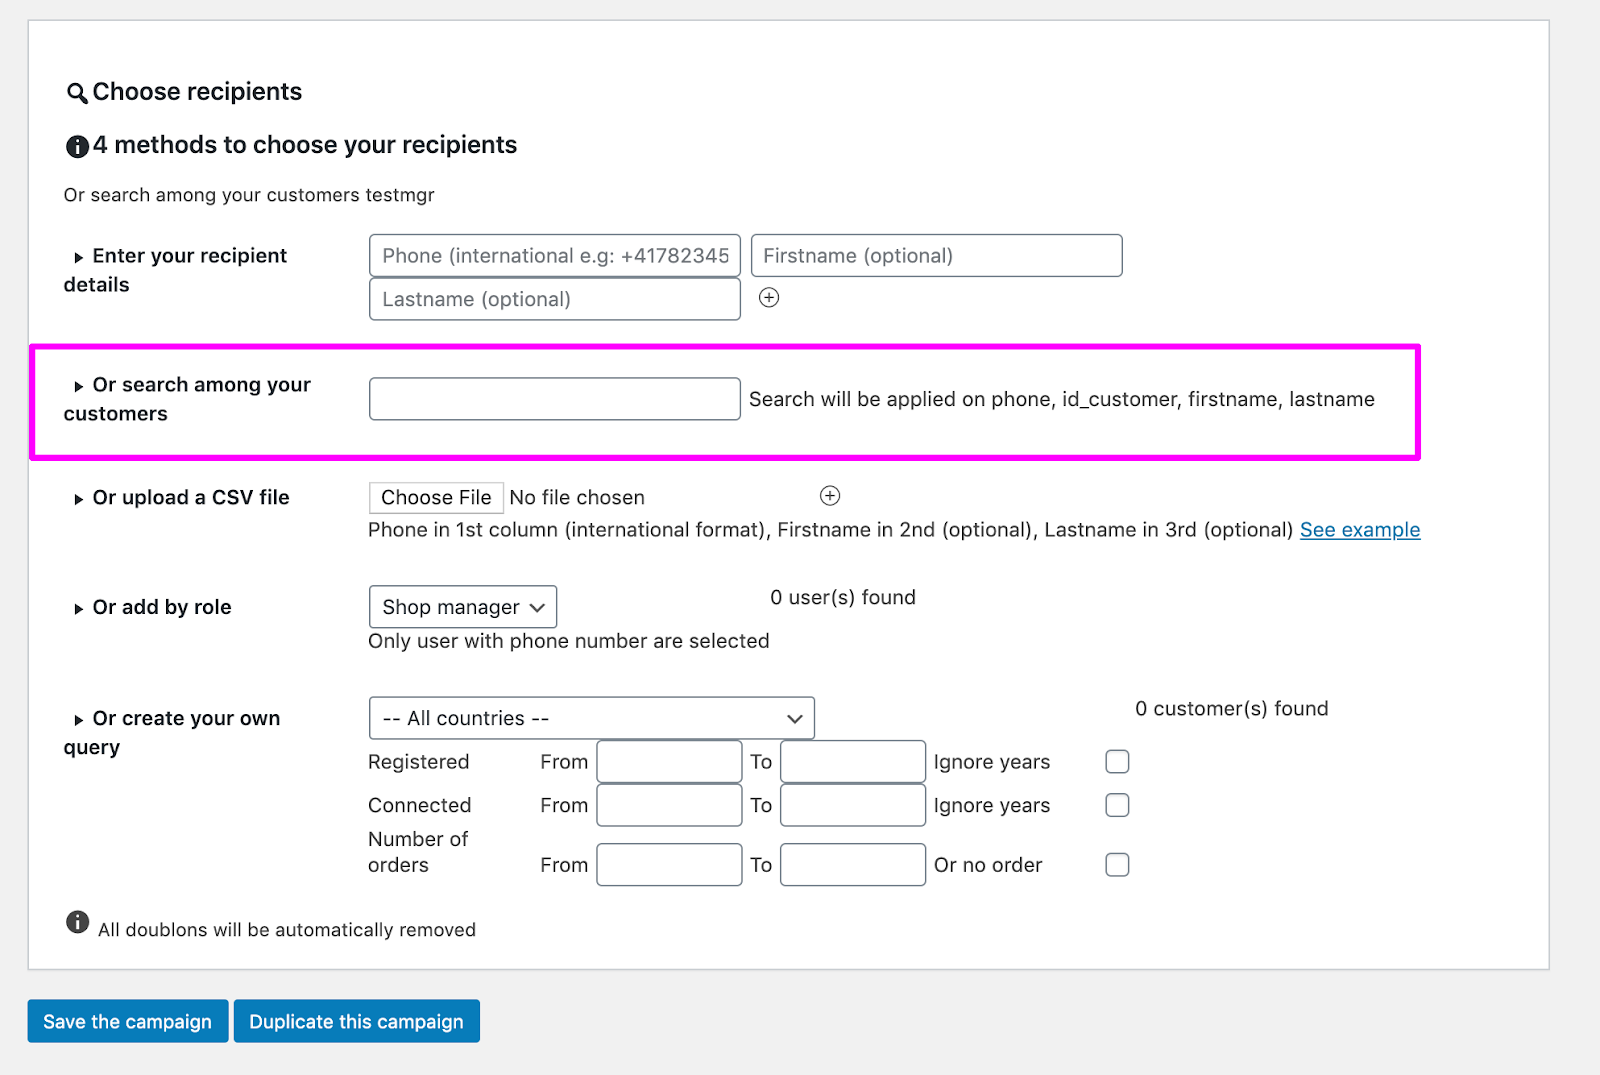
Search for customers
Start typing the phone, ID, first name or last name of your customers to look for them on your Woocommerce database.
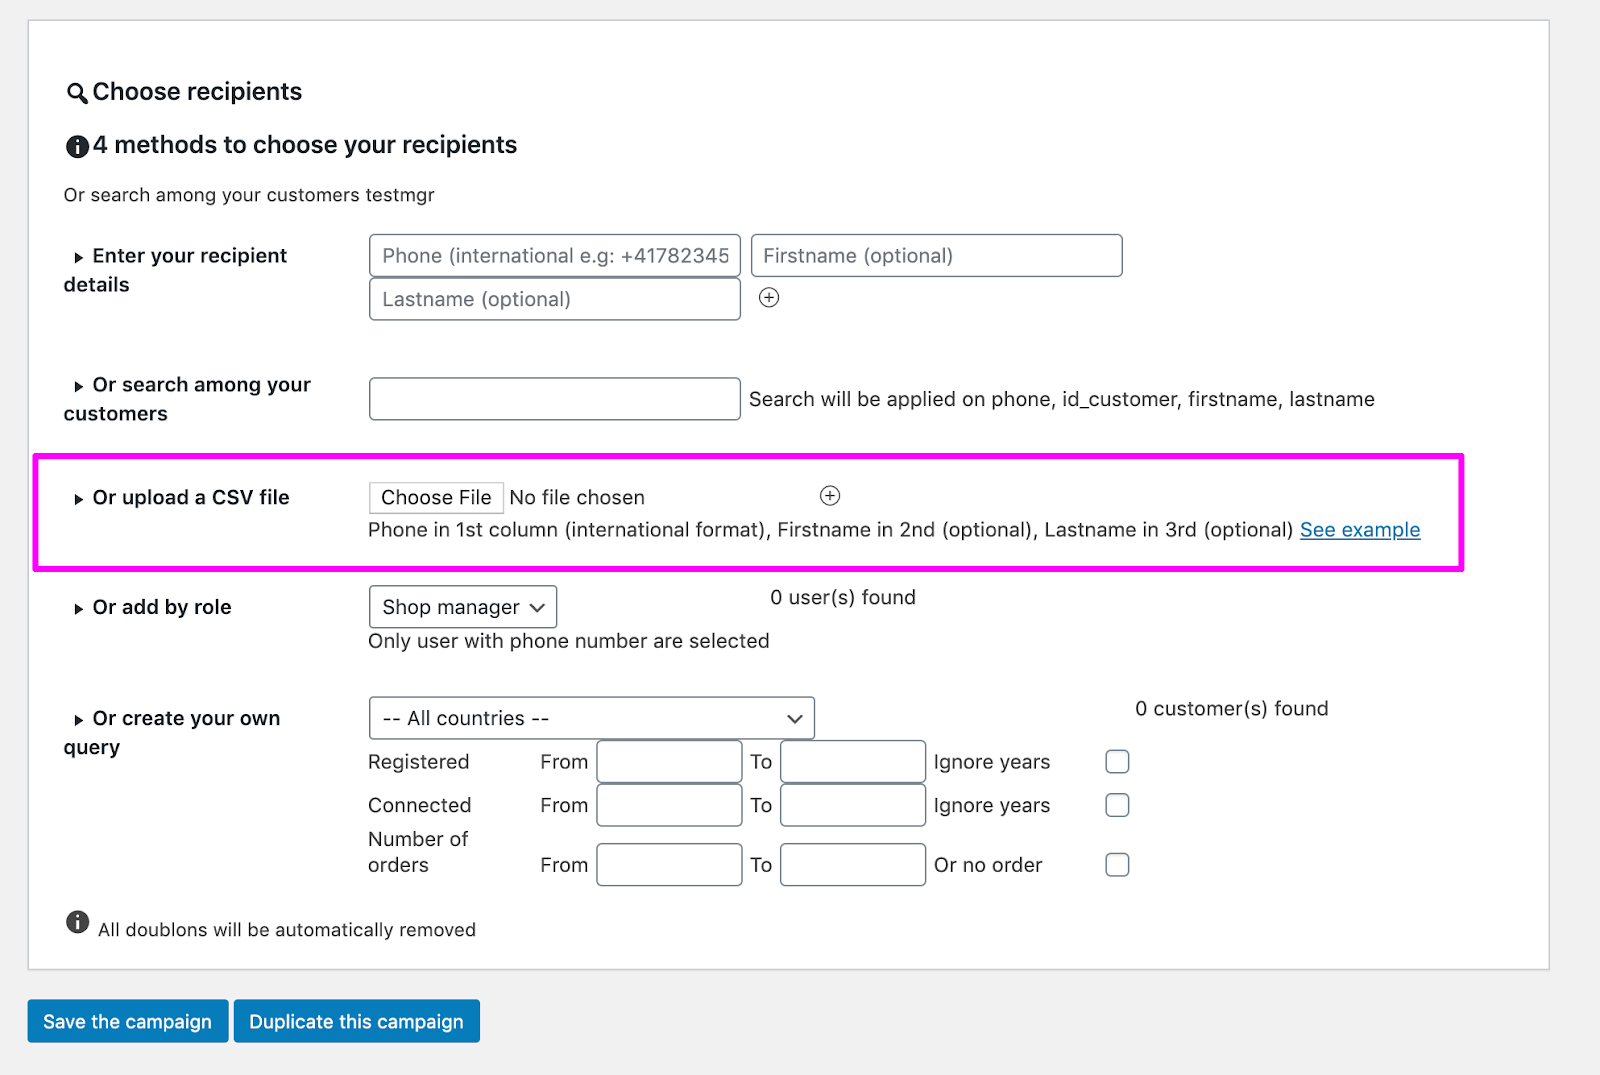
Upload a CSV file
If you have the phone numbers of your contacts in Excel or Sheets, you can upload it here in CSV format. After uploading remember to click on the sign + to add them to your recipients list.
Here’s an example of how it should look like in Excel or Google Sheets. In the same column, include the phone number with the sign + and country code followed by the name and last name separated with the sign ;.
Note: to avoid the formula in Google Sheets when you put the sign +, type the sign ‘ first like you see in the example below.

Add by role
You can choose to send a campaign to your own team by selecting their roles they have in your Woocommerce store.

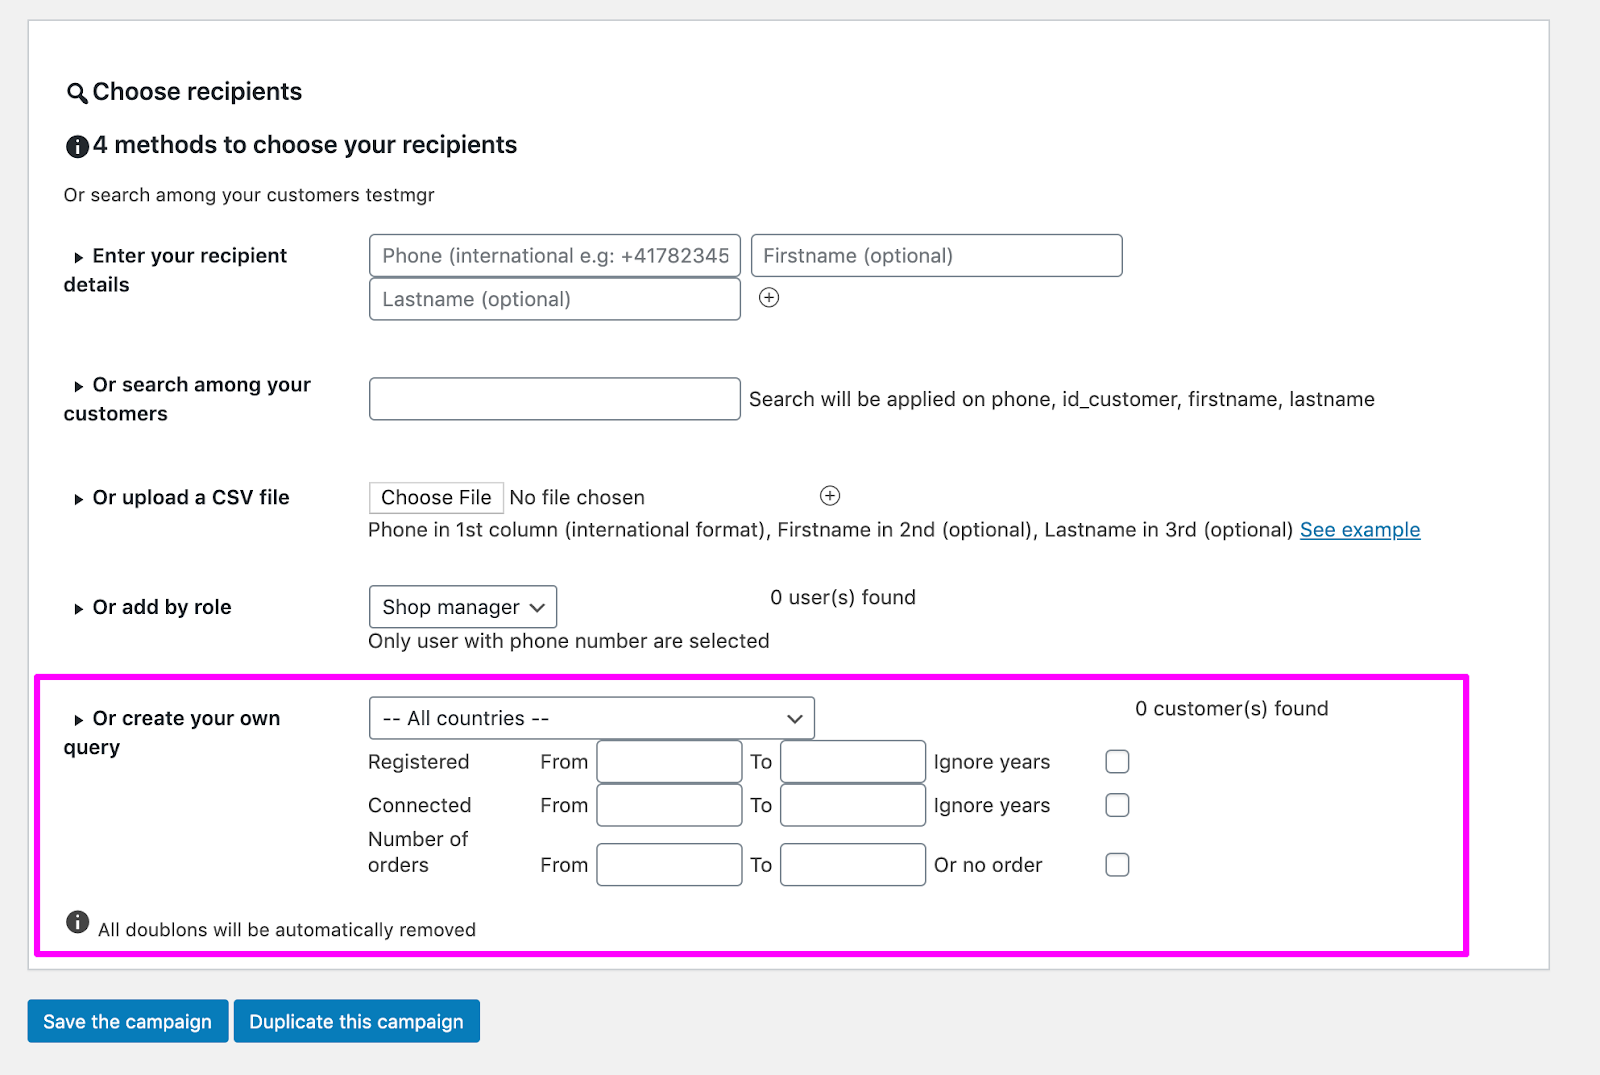
Create your own query
You can choose to segment your customers with the data you collect from them with Woocoomerce. Create your target audience combining the following variables:
- Country
- Groups: visitor, guest, customer
- Gender
- Birthday: from a certain date to another.
- Registration date
- Last connexion date
- Number of orders
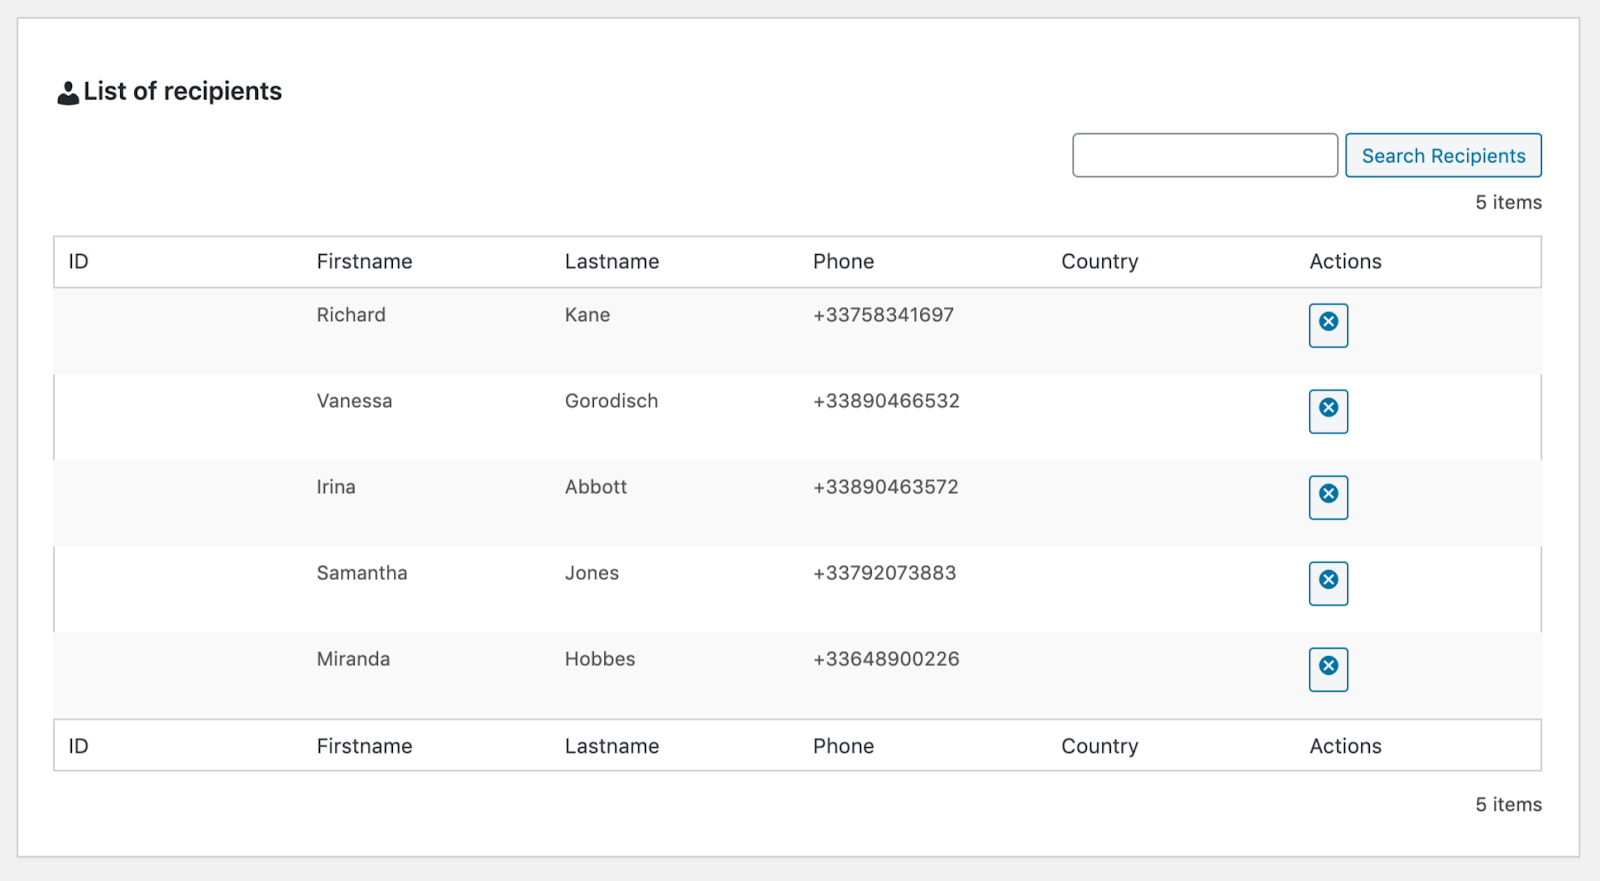
List of recipients
Once you’ve added your recipients, you’ll see them here. You’ll notice that the Number of recipients in the Information tab will also increase.
Information
Here you’ll see all the information about the status of your campaign.
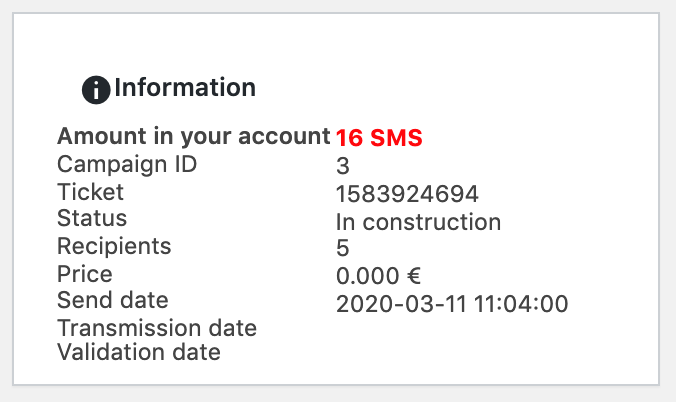
- Amount in your account: the credit you have left in your Octopush account. You can add more credits for your campaigns by clicking in Buy credits or directly from your Octopush account
- Campaign ID: number that identifies your SMS campaign sent from Woocommerce with this extension
- Ticket: number that identifies your SMS campaign in Octopush. Use this number if you ever have to report a technical problem to support@octopush.com
- Status: status of your campaign. “In construction” when you’re crafting your message, and “Waiting for validation” when you’ve transmitted to Octopush but still pending to Accept and Send.
- Recipients: number of recipients that will receive the message on your campaign
- No. of SMS: how many SMS are on your message. Note: to learn more, go to Settings > How to calculate the amount of SMS per message in this guide
- Price: how much will be the cost of your campaign (in Euros)
- Send date: when your campaign was created
- Transmission date: date when your request was sent to Octopush from the Woocommerce extension
- Validation date: the date you clicked on "Accept & Send"
History
Here’s where you’ll find the history of all your sent campaigns.
Use the pencil icon on the right to see the details of every campaign.

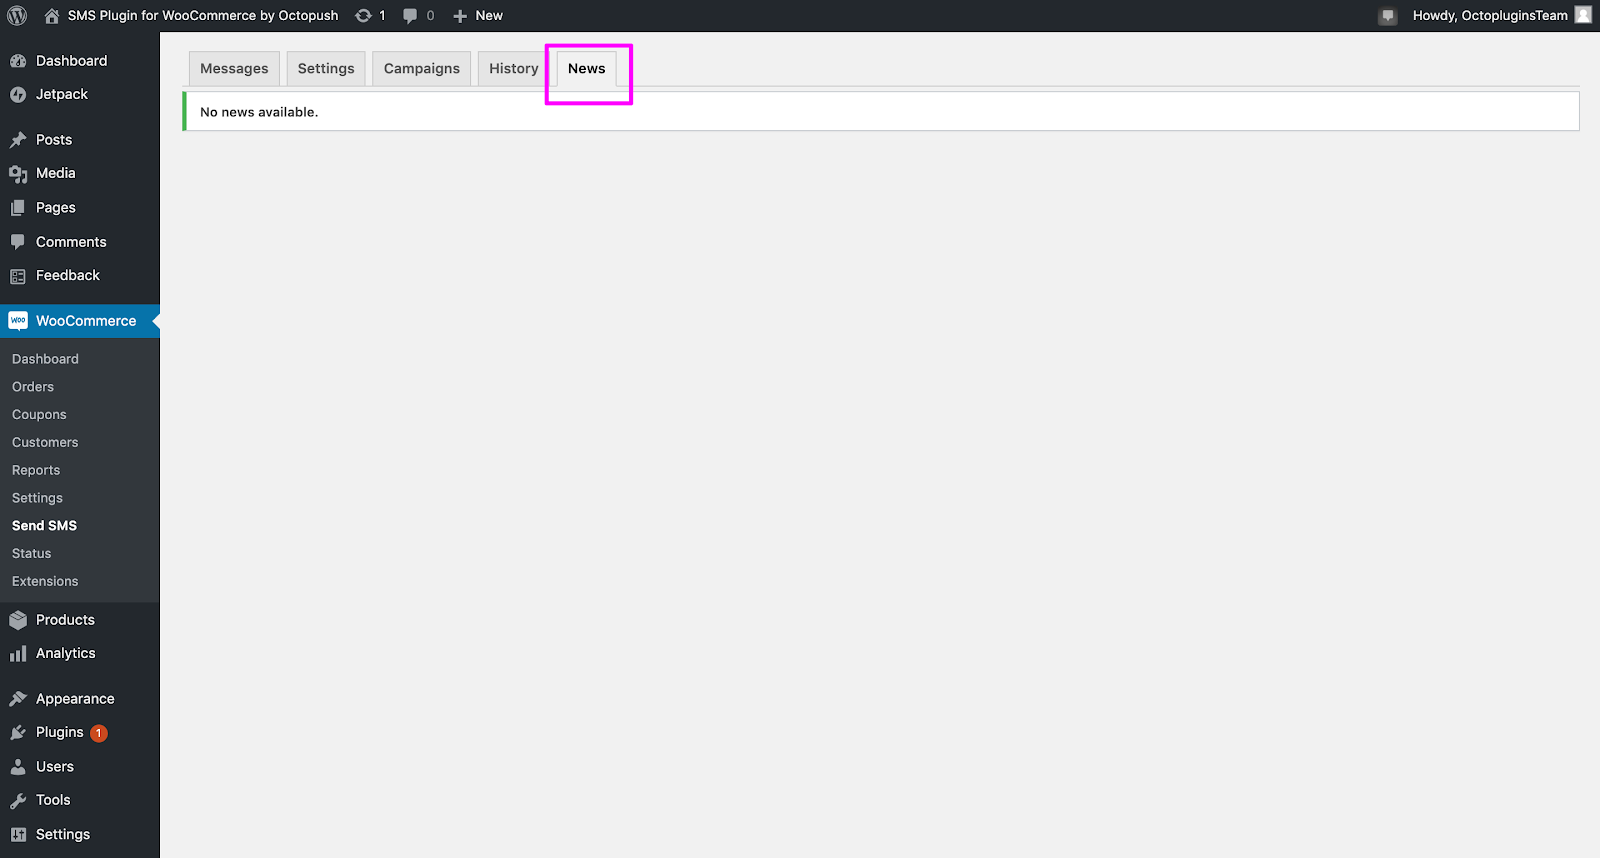
News
Here you’ll find all the updates related to the different versions of the extension.
When a new version becomes available, you’ll be notified on this tab.
Support & Resources
We hope you found this guide useful, but in case of any doubts, questions or comments, please email us to support@octopush.com
For more free resources, tutorials, templates or tips on how to improve your SMS Marketing strategy visit our octopush.com/en/blog or our YouTube channel.
For more information about our services, visit us on www.octopush.com